Building a Cost-Effective Kubernetes Environment with secure CI/CD Pipelines: A Comprehensive Guide
If you want to optimize costs in setting up and managing Kubernetes in a cloud environment with integrated CI/CD workflows, this guide provides practical strategies to help you achieve that.
It offers a detailed approach to installing and configuring essential tools for setting up Kubernetes and integrating it with CI/CD on a Windows/Desktop environment. You'll find step-by-step instructions for setting up Chocolatey, Docker, Git, Minikube, kubectl, CircleCI, and ArgoCD.
By following these steps, you’ll establish a robust development workflow that leverages these tools effectively while minimizing cloud costs
Prerequisites: Create accounts on the following websites if you don’t already have them:
GitHub or GitLab
Docker Hub
CircleCI
Install Chocolatey for Windows
Chocolatey is a package manager for Windows, designed to make the installation, upgrading, and management of software easier on the Windows platform. It's similar to package managers on other operating systems, such as apt on Debian-based systems or yum on Red Hat-based systems.
Search for and run the PowerShell application as an Administrator.
Run the command below in the PowerShell terminal:
Get-ExecutionPolicyIf it returns
Restricted, then run:Set-ExecutionPolicy AllSignedor
Set-ExecutionPolicy Bypass -Scope ProcessRun the following command to install Chocolatey:
Set-ExecutionPolicy Bypass -Scope Process -Force; [System.Net.ServicePointManager]::SecurityProtocol = [System.Net.ServicePointManager]::SecurityProtocol -bor 3072; iex ((New-Object System.Net.WebClient).DownloadString('https://community.chocolatey.org/install.ps1'))If you don't see any errors, you are ready to use Chocolatey! You can also visit the Chocolatey website for an extensive guide.
Install Docker Desktop
- Follow the instructions at Docker's official documentation.
Install Git
- Download and install Git from Git SCM.
Follow the instructions at Kubernetes official documentation.
To install kubectl using Chocolatey:
choco install kubernetes-cli
Check to ensure the version installed is up-to-date:
kubectl version --client
Minikube for Windows
Minikube is local Kubernetes, focusing on making it easy to learn and develop for Kubernetes.
All you need is Docker (or similarly compatible) container or a Virtual Machine environment, and Kubernetes is a single command away: minikube start
You may visit Minikube's start guide for setup.
Requirements:
2 CPUs or more
2-4GB of free memory
20GB of free disk space
Internet connection
Virtual machine manager (e.g., Docker Desktop, QEMU, Hyperkit, Hyper-V, Podman, VirtualBox, VMware Fusion/Workstation)
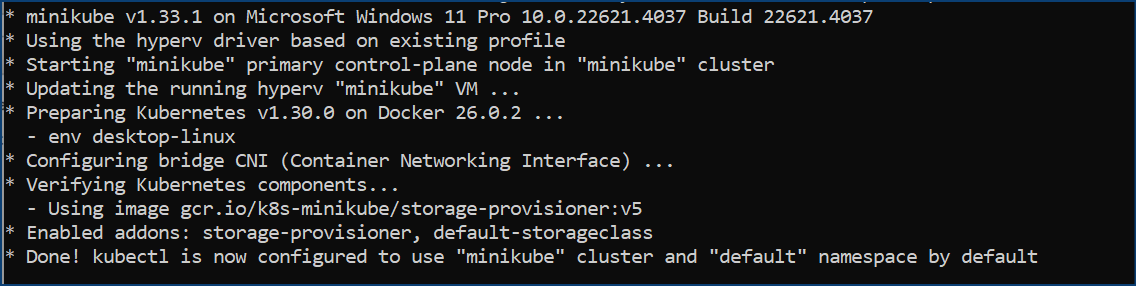
Install minikube with chocolatey and start your cluster:
    choco install minikube
    minikube start
If that returns an error related to the virtual environment, try:
    docker context ls
    docker context use desktop-linux
    minikube start --driver=docker --docker-env="desktop-linux"
    OR
    minikube start --driver=hyperv --docker-env="desktop-linux"
Additional Minikube commands:
    minikube version # Display minikube version
    minikube pause # Tthis will not free up resources or stop the cluster, it will only make the service and cluster unavailable or unreachable
    minikube unpause # Resume cluster services
    minikube stop # Shuts down the virtual machine
    minikube delete # Destroys and clean up the VM data from disk.
For more information, visit Minikube's documentation where you can find basic sample deployments you can try your hands on.
Open the GitHub URL Hotel-Booking and fork the repository.
Follow the instructions to complete cloning the repository to your own github account so that you can work with the copy you have created.
Set Up CircleCI
To set up and configure CircleCI for continuous integration, follow these detailed steps:
1. Sign Up and Connect Your Repository
Go to the CircleCI website and sign up for a free account using GitHub or Bitbucket.
Connect an organization
Give any name of your choice as an organization
In the CircleCI dashboard, select Projects from the sidebar.
Click Create Project and choose the repository you want to connect.
What would you like to do, select
Build, test, and deploy a software applicationGive your project a name.
Next, setup pipeline
Name your pipeline
Choose a repo, select either github, gitlab or gitbucket as repo source.
Authorize CircleCI to access your GitHub or Bitbucket account.
CircleBot, will prepare a custom starter config file to build and test your code.
CircleCI Configuration
- A
.circleci/config.ymlfile will be created automatically if it doesnt already exist. Review it and clicksubmit and run. You may not want to run the one that is suggested for you, you may simply select to run asimlpe hello worldoption, to proceed, then go to your github repo and change it to a working config below that will build and store your codes as images in your docker hub container repository.
Configure Project Settings
By default. a trigger is already created for you, you can check if it exists or you create one.
Environment Variables
To prevent authentication errors to your docker hub environment, you need to set it in your environmental variables.
In the CircleCI dashboard, go to Project Settings > Environment Variables.
Add any necessary environment variables (e.g.,
DOCKER_USER,DOCKER_PASSfor DockerHub authentication).Put in you credentials for your dockerhub account user here.
I have setup below a Config File that will securely integrate the hotel booking application for CircleCI
Note, I have deliberately instructed the security tools to bypass any vulnerability just for demo purposes only. The pipeline will fail with an exit code if there are any vulnerabilities found in the code or docker images built. For production purpose, remove the string || true in the config file.
    version: 2.1

    executors:
      default:
        docker:
          - image: cimg/node:22.6.0
        working_directory: ~/project

    jobs:
      code_security_scan:
        executor: default
        steps:
          - checkout

          - run:
              name: Install dependencies
              command: npm install

          - run:
              name: Run npm audit (ignore failures)
              command: npm audit --audit-level=high || true

      build_and_scan:
        executor: default
        steps:
          - checkout

          - setup_remote_docker:
              version: default  # Ensure Docker is available

          - run:
              name: Docker login
              command: |
                echo $DOCKER_PASS | docker login -u $DOCKER_USER --password-stdin

          - run:
              name: Build Docker Image
              command: docker build -t <githubuser>/hotel:v0 .

          - run:
              name: Install Trivy
              command: |
                curl -sfL https://raw.githubusercontent.com/aquasecurity/trivy/main/contrib/install.sh | sh -s -- -b /tmp/trivy v0.54.1
                sudo ln -s /tmp/trivy/trivy /usr/local/bin/trivy

          - run:
              name: Scan Docker Image for Vulnerabilities
              command: |
                trivy image --severity HIGH,CRITICAL <githubuser>/hotel:v0 || true

          - run:
              name: Push Docker Image
              command: docker push <githubuser>/hotel:v0

          - run:
              name: Remove Docker Image
              command: docker rmi <githubuser>/hotel:v0

    workflows:
      version: 2
      build_and_deploy:
        jobs:
          - code_security_scan
          - build_and_scan:
              requires:
                - code_security_scan
3. Commit and Push Changes
- Commit the
.circleci/config.ymlfile to your repository: This step is taken when you save the config file.
5. Trigger a Build
Push a commit to your github repository to trigger the first build. You can make any small modification to the
config.ymlfile and commit it to initiate a trigger. This step will be mentioned again when we deploy argoCD.Monitor the build process in the CircleCI dashboard under the
Pipelinessection.
6. Monitor and Manage
Use the CircleCI
dashboard--> Click onPipelinesto view build logs, test results, and deployment status.Failed builds are automatically sent to your email used to register a CircleCI account, sometime in junk/spam folder, you may add it to safe sender list.
By following these steps, you can set up CircleCI to automate your project's build and test processes, integrating seamlessly with your existing GitHub or Bitbucket repositories.
Lets now Install ArgoCD
Create the namespace and install ArgoCD:
 kubectl create namespace argocd
 kubectl apply -n argocd -f https://raw.githubusercontent.com/argoproj/argo-cd/stable/manifests/install.yaml
kubectl -n argocd get all kubectl get svc -n argocdChange ArgoCD server service type to NodePort:
- Agrocd-server service is using “ClusterIP”. We can change it to NodePort” to access the agrocd UI from your local browser.
        kubectl edit svc argocd-server -n argocd
        OR
        kubectl edit svc argocd-server -n argocd -o yaml
A notepad will be automatically opened, scroll down and change from ClusterIP to NodePort. Now service will be changed to “NodePort”
Note the Minikube Control Plane IP Address and ArgoCD service port that will be used to access the argoCD URL:
 kubectl get node -o wide
 kubectl get svc -n argocd
Download and install Argo CD CLI:
Visit ArgoCD releases for the latest version. Explore the GitHub repo for newer release if necessary.
Run ArgoCD CLI commands from the Windows command prompt, Open windows CMD as administrator, change directory to location where you downloaded the argocd exe file. Do not double click on the exe file and try to run directly from windows, it may be flagged.
  argocd login $ARGOCD_SERVER --username admin --password $ARGO_PWD --<insecure/secure>

  #Sample command below:
  argocd-windows-amd64.exe login <MinikubeIpAddress>:ArgoCDServicePortNo> --username admin --password xxxxxx –-insecure
Access ArgoCD UI:
Retrieve the initial admin password: After reaching the UI for the first time, you can login with username: admin and the random password generated during the installation. You can find the password by running:
 kubectl get secret -n argocd
 kubectl describe secret argocd-initial-admin-secret -n argocd
 kubectl get secret -n argocd argocd-initial-admin-secret -o yaml
The password is still encrypted so you have to decrypt it.
Windows may not support native base64 decoding, you can use an online website at https://www.base64decode.org/, insert the values and decode it.
We can use this password to login. After login it is recommended to change the password.
Update password in the GUI, User Info Section --> update password --> Save
You should delete the initial secret afterwards:
 kubectl get secret -n argocd
 kubectl -n argocd delete secret argocd-initial-admin-secret
- In the ArgoCD web interface, click on Settings -> Repositories.
On the next page, click on Connect Repo
Fill out as below. Scroll up and click on Connect.
Now we have connected our GitHub repository with ArgoCD. Next is to create an application.
- Click on the Applications page and click on Create New App.
- Fill in the details as below.
Scroll down the page and fill in the
sourceanddestinationdetails. The deployment YAML for our case repo is inside theK8Spath; we need to put that as our path.Select the cluster URL and namespace. Now click on Create. It will create the app.
Upon completion of the creation, argoCD will attempt to automatically deploy the hotel app using the
K8Spath that we have defined, this is where thedeployment.yml filewas placed. Upon successful deployment, We will find the hotel app deployed in the minikube cluster.kubectl get allWe can access the hotel app using the
minikube controlplane NodeIPandhotel service port no.
kubectl get nodes -o wide
From the checks above, URL will be http://172.27.217.12:30537
Now we can make a change/update to the booking app by modifying a content of the source codes, here i have modified some details in the
src\routes\home\home.jsxpath. Once the file is saved and committed, CircleCI previously configured will automatically detect this change and run the pipeline in.CircleCI/config.yml, to scan and build a new image, then push it to Docker Hub repository, ready for deployment by argoCD.Update that image details in your
K8S/deployment.ymlfile in your repo and click on Sync in the argoCD app. This means that if CircleCI builds an image with a tag of v2, then you have to update the image tag inK8S/deployment.ymlto v2 also.
The hotel-deployment in you cluster will be automatically updated with the new modification you have made.
When you click on Sync with argoCD, you have some options tick boxes to select from. If using Argo CD for the first time in a development environment, here are some basic options you might consider selecting:
Options
Revision: The revision is set to
HEAD, which means the latest commit in the default branch will be used.DRY RUN: This is a safe option to start with as it allows you to simulate the synchronization process without making any actual changes. It helps you verify what changes would be applied.
Sync Options
AUTO-CREATE NAMESPACE: Useful if you want Argo CD to automatically create the namespace for your application if it doesn’t exist. This can simplify setup in a development environment.
APPLY OUT OF SYNC ONLY: This option ensures that only resources that are out of sync with the Git repository are updated, which can be useful for incremental updates.
Additional Considerations
PRUNE: You might want to use this cautiously. In a development environment, it can be useful to remove resources not defined in your Git repository, but ensure you understand its impact first.
RETRY: Consider enabling this if you want Argo CD to automatically retry synchronization in case of failure, which can be helpful during development when changes are frequent.
These options provide a balance between safety and functionality, allowing you to manage your applications effectively while minimizing risks.
Prune Propagation Policy
- FOREGROUND: Deletes resources in the foreground, blocking until the resource is fully deleted.
Additional Options
- REPLACE: Replaces resources instead of updating them, which may lead to downtime.
This configuration is used to manage how Argo CD synchronizes application manifests from a Git repository to a Kubernetes cluster. Each option provides control over how resources are applied and managed during the sync process.
In Conclusion
By following this guide, you’ll have set up a budget-friendly CI/CD system running kubernetes on your Windows/Desktop using tools like Chocolatey, Docker, Git, Minikube, kubectl, CircleCI, and ArgoCD. This setup makes your development process smoother and cuts down on cloud costs.
You’ll discover how to set up and use each tool, connect them together, and automate your development tasks. With Minikube, you can run Kubernetes locally, and with CircleCI+ArgoCD, you can integrate/deploy and manage your apps.
Using these tools will help you manage your code, build projects, and deploy apps more easily and effectively, making your development work more reliable and efficient.